Julie Bowersett

juliebowersett{at}gmail{dot}com
Navigation
Search
Categories

Blog Writing Course Alumni

From Guide to Art Schools

CraftGossip

Entries in sewing (68)

Monday
Jan252010

love in bloom

I have a new obsession.  I recently bought a book Kanzashi in Bloom by Diane Gilleland.  This lovely, lovely book is full of instructions for turning little squares of fabric into beautiful blooms called Kanzashi, based on an ancient Japanese art form.  This picture shows the first one I made.  As Diane says in her book, this is an addictive craft.  I have already made five.  The results belie the ease with which these flowers come together.  Diane has put together a great video to show you how to make one style of flower.  Wendy Martin from bagsandbuds has written a tutorial for making another style.  Try one of these and send me a picture of your fabulous bloom.

Saturday
Jan232010

from my sewing room

I’ve been working on a scarf to donate to a silent auction for an event I’m attending next month.  I’ve done this for a number of years now and I can’t always predict what will be a hit.  One year I spent a ton of time making a small wardrobe for an American Girl doll thinking this would be very popular but it wasn’t.  Another year I cut up a printed velvet scarf that I had purchased at a thrift store for $1 and made it into a simple evening bag.  It went for big bucks.  I have also learned that the way I feel about a piece is also no indication of how well it will sell and am no longer disappointed when something I love is not loved as much by others.  The scarf I’ve made this year is not something I would personally wear, but I am hoping it will appeal to some of the artistic-of-nature in the crowd.

I based the design on a scarf by Diane Ericson which can be found in Linda Lee’s book Scarves to Make.  The body of the scarf is made from silk velvet.  The ends are embellished with three knots.  The largest and smallest are made from dupioni silk.  The middle size is made from stretch velvet.  The tassel is formed by tying a piece of silk organza over the smallest knot and securing with silk ribbon.  Silk velvet is a very trying fabric to work with.  I have found that basting the seams with Wonder Tape before stitching prevents the fabric from shifting, a real sanity saver.

Here’s hoping I’ve come up with a winner this time.

Wednesday
Jan202010

Bag of the Week 3

It’s been exactly a month since Old Man Winter dumped record-breaking amounts of snow on the Washington, DC area.  And here comes Mr. Snow Guy, just in time for our wintery January weather.  This little winter white wool pouch was adorned with a design by Kathleen Parman.  Kathleen developed a technique she dubbed “Herky Jerky” to describe the free-motion quilting around the edges of the appliquéd pieces.  Kathleen also developed a very clever machine embroidery technique for stitching up this and other designs.  This purse was done with one of her machine embroidery designs.  I appliquéd the design onto black fabric and sewed it to the front of the purse.  The purse is lined.  The Fun Fur I-cord around the top was made in the same manner as for The Safari Bag.  The strap is twisted cording made from winter white yarn and the Spinster tool.  I think this Snow Guy lives with my friend Michele now.

An internet search failed to turn up Kathleen's website.  Some of her patterns, including two of her machine embroidery CDs are available from Soft Expressions.  Sulky has a great tutorial complete with pattern and instructions for a Herky Jerky sweatshirt.  This technique is really fun and easy to do.  I will be featuring several other designs by Kathleen in the future.  Check back each week.  And that's what it's all about!

Monday
Jan182010

My Blogging Journal

When I made up my mind to start a blog the ideas starting flooding in, and I decided I had better write them down as they arrived and save them for the future.  So I started a blogging journal where I recorded ideas for names, content, tutorials and the like.  A little time later I decided that I needed a beautiful, inspiring cover to go on the journal.  Several years ago I came across a number of blank journals at Borders for a very reasonable price so I bought a small stash.  I had made this covered journal as a gift for my friend Tera and dug out my notes from that project. 


I strongly encourage you to make notes about the things you create.  Trust me – those projects you believe to be one-of-a-kind have a way of resurfacing, and it is so nice to be able to look at your notes and not have to go through the figuring-out process again.  Sometimes I make these notes directly on the pattern for the project, sometimes in a little book I keep for the purpose.  So, I pulled out my little note pad and there were the details I needed.

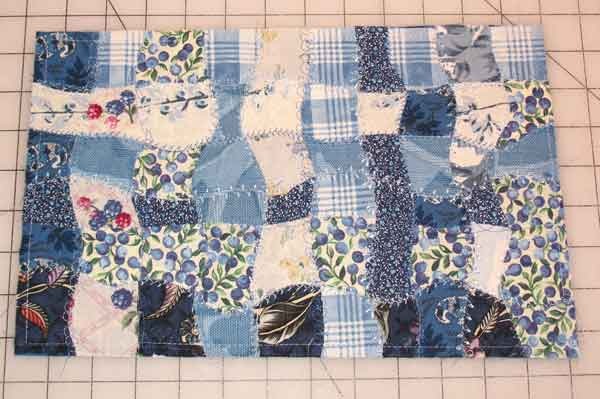
I had planned to make one similar to the one I made Tera but with a different icon on the front.  But my time is very short these days with trying to complete all of my planned projects and now trying to find time to blog about them.  I also am on a quest to use up things I have laying around my sewing space.  While I was planning my cover I remembered that many years ago I had made a sample for a class I was going to teach that might work well as the base for this cover.  On measuring my sample it was just a bit too small in one direction, a problem easily solved with the addition of two fabric strips along the edges.


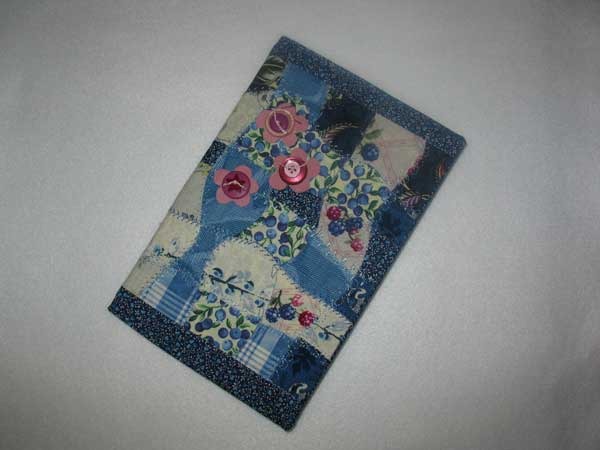
When the cover was finished I thought it needed a little something else so I embellished with hand-cut ultrasuede flowers and buttons.  I now have a place to write all of my brain storms as they come to me, and one that is stylish and inspirational, too.


I’ve written a tutorial on how I made this cover so you can make one, too.  Click on the Tutorials link in the right side bar.  Make sure you check out my tip for drawing freehand flowers even if you can’t draw (like me!)  If you like the journal cover I made for Tera I am planning a tutorial on how I created the background fabric for that which can be used for any number of projects.  Enjoy!


Friday
Jan152010

Sweet Treats

OK, so the Christmas holidays are behind us, but since I just got my decorations put away today I feel entitled to share this picture with you.  These are some bag toppers I made this year for the kids in my son’s preschool class.  They are super easy and fast to make, and you can fill the little bags with lots of different goodies.  The design comes from Reen at Embroidery Garden and she also has designs for lots of other holidays and events, too.  So, I am a little late for Christmas but I am just in time for Valentine’s Day!

These were stitched on stiffened felt and cut to size after they were finished.  I was able to put three in my larger hoop and sew them all at once.  The toppers were then stapled onto 3” x 4” craft bags with a ziplock closure and filled with treats.  So fast, fun and yummy.