Julie Bowersett

juliebowersett{at}gmail{dot}com
Navigation
Search
Categories

Blog Writing Course Alumni

From Guide to Art Schools

CraftGossip

Entries in sewing (68)

Monday
Apr112011

Sewing Inspired Centerpieces

Today's post is a little different as I am highlight the work of other crafty folks.  My fellow American Sewing Guild members, to be exact.  Several weeks ago our ASG Chapter held our annual Spring Fling, a lovely luncheon with time to socialize with like-minded gals, see what people have been sewing and add to our stashes through a silent auction.  This year, as in the past, each Neighborhood Group was asked to make and donate a centerpiece for the event.  The following pictures are of the various contributions. 

A large variety was represented.  Some groups dug into their button boxes and stashes, creating flowers.  Others combined various notions into a bouquet of sorts.

Many of the centerpieces included new sewing items such as thread, fabric, patterns and other notions.

Other groups put their talent to work and created something that represented the theme of the group (such as machine embroidered designs from our Hoopsters group and a finely dressed doll from the Couture group).  By the way, these lovelies were all given away as door prizes to some lucky winners.

When my group was preparing to create our own centerpiece, one of the members noted that she had done a Google search for sewing inspired centerpieces and came up completely empty handed.  I, too, did several searches along this theme and also found nothing.  So my hope is that, in the future, when some other sewing group is looking for inspiration, they will come across this post with lots of fun ideas.  I hope you enjoyed seeing just how creative our Chapter can be. 

Friday
Feb042011

The Cassandra Skirt

The sewing world lost a wonderfully talented designer and teacher in September of this year.  Fred Bloebaum, who was familiar to so many for the classes she taught and the patterns she created, died after a battle with pancreatic cancer.  The Cassandra Skirt by LaFred is a lovely and unique pattern.  I first saw the skirt made up at the local sewing Expo several years ago and loved its simplicity and drape.  Another sewing friend and American Sewing Guild member told me about the skirt she made from this pattern.  She said that people would stop her on the street and in airports to ask about it. 

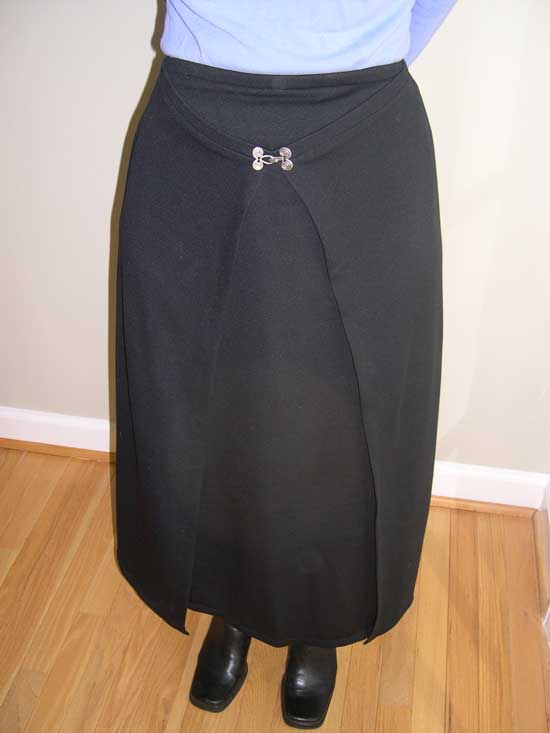
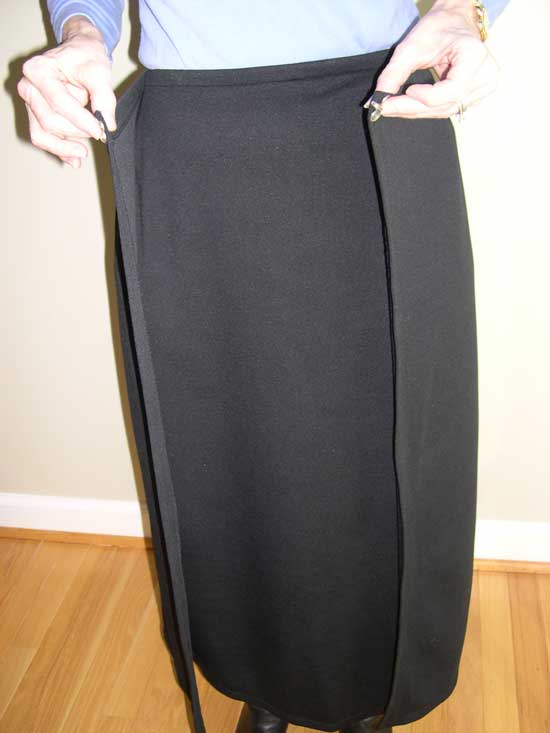
The description on the pattern envelope reads:  A fitted, flared mid-calf length skirt with separate center panel and side/back panel which wraps around and meets at center front with a decorative closure.  Skirt is cut on the bias at the center back with a slightly fish-tail shaped hem and an invisible zipper.  Suggested fabrics include those with drape and weight such as crepe (wool, silk or rayon), wool double knit or jersey and other drapey mid-weight fabrics.   Even though the pattern cautions against using synthetics that will not hold a crisp edge when pressed, I dug into my stash and found a piece of black mystery cloth, a fairly heavy-weight knit that pressed reasonably well.  The yardage requirement is fairly large for this skirt; there will be some large pieces left over (due to the single layer layout) so you may want to plan a matching garment from the remnants.

Fitting issues and finished length need to be resolved before construction, and the pattern gives tips on how to best accomplish these tasks.  I found the pattern easy to adjust for a waist that is two to three sizes smaller than the hip.  Since the side and back seams are straight lines it was easy to taper from the smaller size at the waist to a larger size at the hip.  The pattern includes sizes 6 through 26 (hip size 32.5 through 50).  I found the sizes ran a bit small; that is, I needed a size 14 for my hip measurement even though I tend to use a size 10 or 12 pattern when sewing from “the Big 4”.  This would be a great pattern for a thin teen as the smallest waist size is 23 inches.

The instructions are very good and very thorough.  There are two options for seam finishes (serging and turning under) as well as instructions for mitering corners, using tag board templates for pressing and installing an invisible zipper.  The inside of the skirt turns out beautifully finished as all of the corners are mitered (eight, in all).  One thing I particularly liked was that once the basic construction was completed the skirt was already hemmed and ready to wear.

The skirt is constructed in two units.  The first is the front panel which is essentially a rectangle.  All edges are turned under and the corners mitered.  The second unit consists of two panels joined together at the center back seam by an invisible zipper.  This seam line is flared which creates drape at the center back.  The front edges of this unit are straight and are turned under and the corners mitered.  The back section is lapped over the front panel and the two units are attached to one another at the side.  The back panels are then closed at center front with a decorative closure.

I recommend you try this pattern.  I think it would look lovely on a wide range of figure types, and the fitting involved is not too difficult.  The style is casually elegant and the drape figure-flattering.  And don’t be surprised if someone stops you on the street to ask, “Where did you get that wonderful skirt?”

Friday
Jan282011

My Brown Jacket -- FINISHED!

As promised last week, here is one of the garments I completed at my recent sewing retreat.  Now, let me just say that I sewed up this jacket five years ago and have been wearing it for all of that time but it never had a closure!  Here's the rest of the story:

I try to not wear black.  I don't succeed in that goal because black is just too convenient, especially for travel.  My leather jacket is black.  I wear black pants and shoes.  I even own a black dress or two.  But I really look better in navy blue or brown.  So a few years ago I decided that I needed a brown outerwear jacket to go with my ever-increasing brown wardrobe.  I found this piece of heavy wool coating at G Street Fabrics.  I bought the buttons there, too, unique wooden ones with a curved shape (they cost more collectively than the fabric did).  I used Louise Cutting's By Popular Demand pattern, a pattern I had used before, but cut a size larger for wearing over street clothes.  I used a satin coat lining with a flannel back for extra warmth.  I added interior pockets and changed the patch pockets from the pattern into a rounded shaped.  I laboriously topstitched every seam.  When it came time to make button holes I balked.  The fabric was much too thick at the center front for a machine-made button hole.  What to do?  Well, for several years I did nothing.  I simply wore the coat open.  I finally decided the answer was large snaps with the buttons sewn on top.  So this past weekend, while I was at my sewing retreat, I sewed on the snaps and buttons.  I like how the shape of the button is mimicked by the pocket.

What I was unprepared for was how warm this jacket is now that it is closeable!  We have been having some extremely cold weather here in DC and this jacket is the best!  I can't believe I waited 5 years before finding out what a useful jacket this is.  And stylish, too.  I'm happy.

Thursday
Dec162010

Bag of the Week 50

Folded Quilted Tote Bag

Many years ago (before I had kids) I used to attend a sewing retreat with the Richmond Chapter of the American Sewing Guild at Holiday Lake 4H Camp in Appomattox, VA.  Our sewing space was a lovely lakeside cabin with beautiful views.  I met so many nice people at those retreats, and one year I watched as a number of the ladies made this fantastic tote bag.  I went home and made one for my mom out of fabrics I had in my stash.

This bag is terribly difficult to photograph – it has lots of nooks and crannies that are just impossible to show properly.  In the photo above there is a pocket underneath the triangular flap and an identical one on the opposite side of the bag.  In addition, in the center of the bag (between the top folded edges is another pocket.  PLUS I added a zippered pocket on one inside wall.  This bag starts out as a flat square, 31” in this case, which is then folded and stitched into the tote you see.  It is a fun and easy project.  Below are instructions for folding your finished square into the bag.  You can make your square in any method you choose.  My sample is strip-pieced onto a solid fabric foundation (with a thin layer of batting between) and the edges bound.  You can also use whole cloth for both sides and either bind the edges or stitch right sides together and turn. 

1.        Fold square diagonally with right sides together to form a triangle.

2.       Measure along the folded edge, divide this length into thirds and mark.  Beginning at the folded edge, draw a perpendicular line at these points stopping 1 inch from the top of the triangle.  Stitch along these lines, backtacking well at the top.

3.       Turn the side points to the outside of the bag along the stitching line – they will overlap and form a pocket on each side.  Stitch the two layers together where they overlap.

4.       Add a strap by stitching the ends to the inside of the bag, centered over the side seams.  Customize your bag by adding pockets to the inside of the bag before assembling.

Tuesday
Dec142010

Key Fobs for Teacher Gifts (and Giveaway!)

My latest project for the holidays is a whole bunch of fabric key fobs, some of which will become gifts for my kids’ teachers.  I found a list of great ideas for teacher gifts including these lovely key fobs.  Now, I believe in giving credit where credit is due, but the link to the tutorial no longer works.  Somewhere between when I originally read the post and a week later when I sat down to make some of these, Buttercuppity’s blog became invitation only.  I was able to access a cached copy and get the details.  Here is a synopsis along with several changes I made along the way:

  • Cut double-sided Peltex (#72) 10” x 1.25”.
  • Cut fabric A (background) 10” x 2.75”.
  • Cut heavy weight fusible interfacing 10” x 7/8”.
  • Cut fabric B (foreground) 10” x 2”.

Center Peltex on the wrong side of fabric A, wrap fabric edges over Peltex and fuse both sides.  Center interfacing on the wrong side of fabric B and fuse.  Fold fabric edges over interfacing and press to crease.  Stack fabric B on top of fabric A with the raw fabric edges facing (sandwiched between layers) and stitch down both sides (you can use fusible tape or Wonder tape to hold the pieces together while stitching).  Fold the resulting strip in half, matching raw edges.  Attach the hardware to the top.  Make sure to cover the hardware with a soft cloth when using pliers to crimp the top closed so as not to mar the metal.  Hardware can be purchased from Country Brook Design (you want the 1.25” key fob hardware).

Since I am really in the spirit of giving this year I will give one of these beauties to someone who leaves me a comment on this post.   You can choose the color and, as a bonus, I will throw in three sets of hardware so you can make your own!  I’ll pick a winner next Monday morning.

Sharing today over at Get Your Craft On (Today's Creative Blog).  Love all of the projects linked up there.  Check them out.