Julie Bowersett

juliebowersett{at}gmail{dot}com
Navigation
Search
Categories

Blog Writing Course Alumni

From Guide to Art Schools

CraftGossip

Entries in sewing (68)

Friday
Feb192010

The Criss-Cross Top

When I describe myself as a sewist, I typically say that I am primarily a garment maker.  This is a bit ironic given I haven’t made a garment (for myself) in almost a year.  For one thing, I have been carrying around some extra pounds left over from my last pregnancy and I have not been anxious to sew clothes that might not fit at a later time.  I’ve now reached my goal weight and am anxious to sew a few new items for my wardrobe.  I have a fun dress all designed in my head which I am hoping to finish before the weather becomes too warm to wear it (though that would be a nice problem, wouldn’t it?)  The other day I put on a knit top that I made last year when I was nursing and was reminded how much I like the pattern.  I decided that I would “test drive” the fabric I’ve planned to use for the dress by making another version of this top.

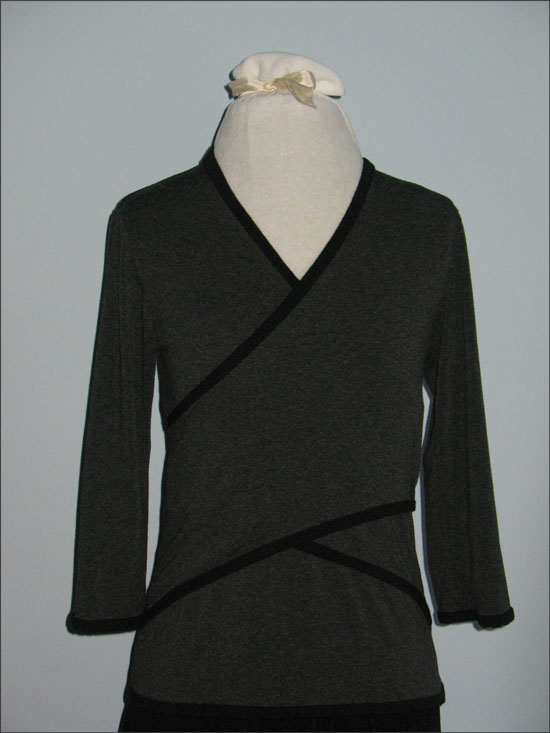
The pattern I used is The Criss-Cross Top (#2787) by Jalie Patterns.  This Canadian-based company, specializing in patterns for stretch knits, is known for easy-to-sew garments with a fashion-forward look.  Most Jalie patterns are sized for stretch knits and come in multi-size format, typically more than 20 sizes per pattern, 2T through Women’s 22.  The instructions are brief but the illustrations are very clear and you can print an extra set from Jalie’s website.  Most of the patterns include multiple sleeve variations (I found you could mix and match sleeves between patterns) and many include an optional modesty panel.  Seam allowance is ¼”, and the tops are easily constructed on the serger.

Both fabrics that I used for this top are cotton/lycra blends with 4-way stretch.  I decided to bind each unfinished edge instead of hemming.  My reasoning was two-fold:  first, I like the way the contrast fabric highlights the gentle curves of the criss-cross panels.  Second, I found when making an earlier version of this top that the neckline turned out too low when the edges were turned under and stitched.  I did not trim off the seam or hem allowances before applying the binding which gave a bit more coverage.  I did shorten the top overall.  

This pattern goes together quickly and nicely, and is very comfortable to wear. 

Stay tuned for the dress.


Wednesday
Feb172010

Bag of the Week 7

Chubby Little Snowman Pail

Chubby Little Snowman had a carrot nose,

Along came Mr. Bunny and what do you suppose?

Hungry little bunny, looking for his lunch

Ate the snowman's carrot nose, nibble, nibble, CRUNCH!

 (as sung by my three-year-old)

Those of us here on the East Coast have had more than our share of snow this year.  And here comes another bucketful of snowy goodness guaranteed to warm your heart even when there are icicles all around.  Farmyard Creations has designed a fabric pail adorned with a snowman, complete with snaps for eyes, an appliquéd carrot nose and buttons down his front.  You begin by layering the outer pail fabric with batting and then fusing on the various pieces of the snowman.  Each piece is machine appliqued with a blanket stitch.  The mouth is hand embroidered, snaps form the eyes and the cheeks are blushed with powder blusher.  This outer layer is then stitched into the pail form and lined.  The quilted handle is secured to the pail with more buttons.

These pails make a wonderful container for homemade goodies at the holidays or for packaging other gifts.  They also make a nice container for holding holiday cards.  There are other designs in this same line by Farmyard Creations including a Santa, angel, bunny and bear.  The patterns appear to be out of print but they are frequently available on Ebay.  From what I can tell, the designer behind Farmyard Creations, Karla Eisenach, has now formed a new company with her daughters called Sweetwater which designs and markets quilting fabric, patterns and scrapbooking supplies.  They have a really wonderful blog which showcases many of their beautiful creations.

Monday
Feb152010

Heirloom Treasures

My sister and I both love heirloom sewing.  We have attended Martha Pullen’s School of Art Fashion a number of times together and have created many lovely things (some of which are still unfinished in my closet).  My sister has always had the dream of making a grandchild’s christening gown, and, with the birth of her first granddaughter last August, it seemed likely this dream would come true. 

A date was set for the christening and Jane got to work on the gown.  She had a head start as some of the elements of the gown had been completed previously at a Martha Pullen school.  Jane has also been spending a lot of time recently caring for my elderly parents (and did I mention she broke her leg in September and has been recovering from that, too??).  As the date for the baptism drew ever nearer she was really working under the gun.  I offered to make the slip that would go under the gown to help clear off her plate a bit (and, as the mother of two boys, I don’t often have the chance to sew frilly little things anymore).

The slip and the gown are both based on the same Martha Pullen pattern, the Heirloom Party dress.  The gown, made from Swiss Nelona, has a high waist with Madeira appliqué scallops around the neckline, lace insertion, and gathered lace framing the rounded yoke.  The skirt features machine- embroidered motifs of ribbons and bows on each side of the central motif of entwined rings enclosing a cross, ribbons and bows.  Lace shaping and Madeira appliqué form the bottom of this panel.  An 8" ruffle with Madeira appliqué scallops outlined in featherstitch embroidery and finished with flat lace complete the bottom of the gown. Pin stitching was added to each side of the lace shaping and to the top edges of the Madeira appliqué.  The dress design is by Sue Pennington Stewart, as taught at Martha Pullen School of Art Fashion several years ago.

The slip is made from Victorian Batiste with a square yoke, gathered skirt and gathered self ruffle.  The hem is trimmed with French cotton lace (purchased at Hollin Hall Variety Store for the Virginia locals), and I machine stitched a shell stitch border around the neck and armholes.  I thought the slip needed “a little something” so I hand embroidered a dainty little floral spray at the center of the yoke just below the neckline.  The embroidery pattern I used was from Jeannie Baumeister’s Old Fashioned Baby line.  I really love doing delicate hand embroidery like this.  It works up SO fast and looks darling.  I think it really adds a nice touch to a baby’s garment.

It seems only fitting that I made this slip.  After all, my sister made the slip that my boys both wore when they were christened.  I had made a little white daygown at one of the Martha Pullen schools and Jane suggested I use that for my baby boy’s christening gown.  I had also made a pink slip to go with this dress but that really wouldn’t do (making a boy wear a dress to be baptized is one thing; making him wear a pink slip is another entirely).  So Jane stitched up a darling little blue slip and embroidered a favorite bible verse, baby’s name and birthdate on the skirt.

The Eyelet Daygown, designed by Connie Palmer, features machine-embroidered eyelets and pin-stitched lace shaping on the bodice and skirt.  The long sleeves are finished with beading and gathered lace and tied with silk ribbon.

The following pictures were all taken in July 2009 by Sally Brewer of Sally Brewer Photography.  We spent a fantastic morning with Sally and she captured pictures of our family that we will treasure always.  I asked her to get some special shots of my littlest guy in the gown.  You can also see the blue slip that Jane made.

So much love has gone into each of these garments.  I love how this story blends generations of my family with the love we all have for creating beautiful things.  My sister was 15 when I was born and helped care for and raise me as a baby.  Her daughter was born when I was only 10 so I grew up alongside of her children.  Now her grandchildren and my children have come into the world and are growing up together.  Sometimes it gets a little confusing figuring out how each player is related to the next but it forms a lovely woven tapestry of family love.


Friday
Feb122010

Love Letters

Last year I was inspired to enter a contest sponsored by Interweave Press and FiberArts magazine in which I created a fabric Valentine postcard, addressed it to my husband, stamped it and mailed it in an envelope to the sponsor.  After the judging was complete, Interweave Press mailed the cards back to the addressee with a hand-canceled postmark of Loveland, CO (where the company is located).  I didn’t win one of the top prizes but my card was one of the ones featured in the magazine article about the contest.

I started with a piece of Timtex as the base for my postcard.  I created fabric confetti from some of my hand dyed cotton by cutting the fabric into very thin strips, about 1/16” – 1/8” wide with my rotary cutter.  I then stacked these strips and cut crossways into tiny pieces.  I applied fusible webbing to one side of the Timtex, scattered the confetti over it and fused into place.  Next I machine embroidered an all-over stipple design which helped hold the confetti in place.  With this as my background I fused the bleeding heart design and leaves on top and stitched them into place.  I used muslin as a backing on which I could write my message and address and finished the entire piece with a bias binding.  All of the materials used (with the exception of the muslin) were from my hand dyed cotton collection.

Watch for a post in the future about creating other fabric postcards.


Wednesday
Feb102010

Bag of the Week 6

Heart Pouch

Here’s a fun little number to spice up your Valentine date outfit.  I created this whimsical little purse several years ago for a show that I was participating in, and it was the first thing to sell at my booth.  The purse is made from red coat-weight wool and is sewn in a simple pouch style.  The heart design is another from Kathleen Parman’s Herky Jerky line (you can read more about Kathleen’s work in my January 20th post).  I stitched the design on black fabric and then stitched the panel to the purse front using more Herky Jerky stitching.  I knit the eyelash I-cord from one strand each of black and red Fun Fur and created the strap from wool yarn using the Spinster.

Here’s another I created using the same design but different colors.