Julie Bowersett

juliebowersett{at}gmail{dot}com
Navigation
Search
Categories

Blog Writing Course Alumni

From Guide to Art Schools

CraftGossip

Entries in machine embroidery (24)

Monday
Apr042011

Tutu Hair Bow Holder

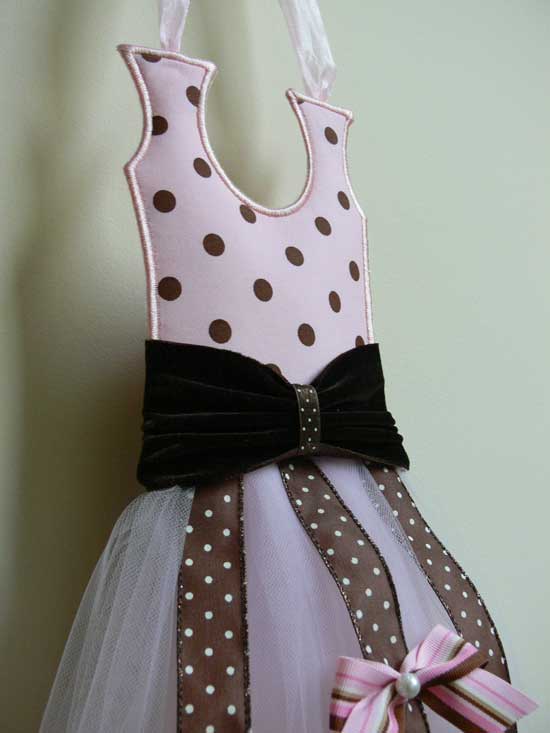
My 4-year-old was finally invited to a girl’s birthday party.  He is one of 9 boys in a class of 12, and we had been to numerous parties for his male classmates.  But I’ve been waiting for a little girl’s party so I could MAKE SOMETHING for a gift.  The birthday girl in question is a little princess-type and loves pink and girly things.  I thought this tutu hair accessory holder by Embroidery Garden would be just the ticket.

Every time I work with one of Reen’s embroidery files I am impressed.  Her attention to detail in her digitizing amazes me.  This project is no exception.  The stitch quality is excellent as are her instructions which are included in PDF format with lots of pictures and suggestions for embellishment.  The bodice portion of the design is stitched on the embroidery machine and the skirt and embellishments added afterwards.  I chose some different embellishments than the sample suggests.   I added bows to the ribbon streamers (this is where the hair bows/barrettes, etc. are clipped on), and around the “waist” I used a piece of stretch velvet, sewn into a tube and embellished further with an additional ribbon.

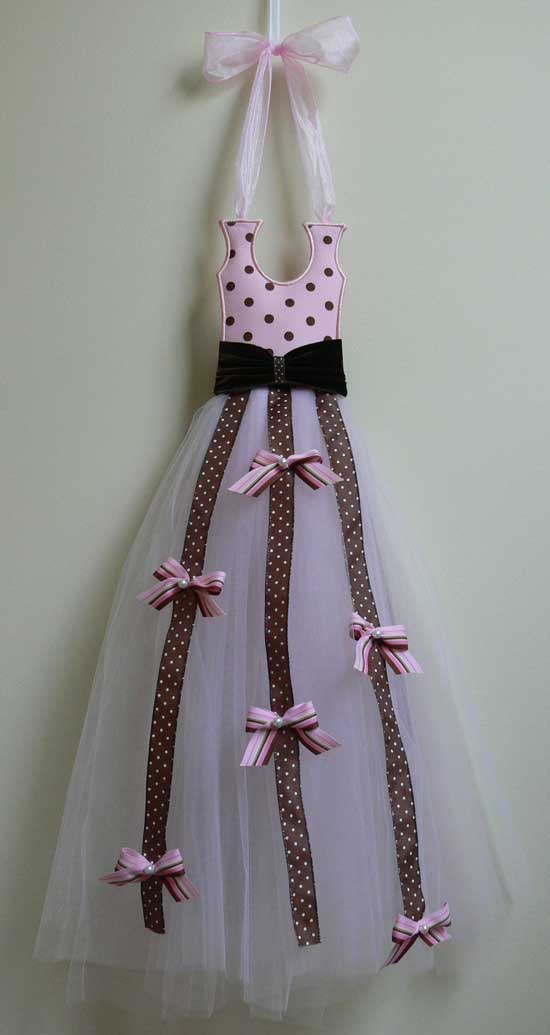
I really like how this turned out and hope that the little girl who received it will enjoy using it as much as I enjoyed making it.  Anxiously awaiting the next girly-girl birthday party. . . .

Tuesday
Dec212010

Felted Wool Sweater Stockings

Some of you may know that my dad passed away earlier this year.  One of the things I took as a memento was an old dirty, moth-eaten and much-mended wool sweater that he used to wear.  I brought it home and threw it into the washer and dryer and felted it.

Next, I took it apart as carefully as I could.  I particularly wanted to remove the front band and pockets carefully (I put them aside for other projects).  Several years ago I downloaded a free machine embroidery design from Embroidery Garden for little Christmas stockings made from a sweater, and I knew this would be the perfect project for my dad’s sweater. 

I created a total of six stockings, each with a different color wool star (which is part of the embroidery design) on the front.  I made one for each of my dad’s grandkids (my two boys will share one) as a memento and will tuck a little note inside the stocking telling the story behind them.

This design was originally a limited-time freebie offered to members of Embroidery Garden’s Yahoo group.   Often, after the time limit for the freebie has expired, Reen will put the design on her regular site for sale.  When I was preparing this post I went looking for the design but couldn’t find it.  I sent Reen an email and she did the most awesome thing!  She posted this design (in THREE sizes) as a freebie on her site!  Thanks so much, Reen, for your generosity.  I know everyone will enjoy using this design.

The stockings are stitched using the ribbing from the sweater as the top of the stocking.  The embroidery design also lets you insert a piece of ribbon for hanging.  I forgot to do that on the first one I made so I thought I would just add the hangers later by hand.  Well, if you want a loop hanger add it as instructed.  I found it impossible to add one later in a way that looked good.  Instead I used a piece of fishing line and made a hanger so these can be used as Christmas ornaments.  (Also, note that I mirrored the design before stitching out my stockings).

I still have a lot of the sweater left and, if I can just find a few more hours this week, will be making some other little ornaments for my siblings.  When those are finished I think I will STILL have some wool left.  I’d like to think that my frugal dad would be happy to see how his old, much-loved sweater is being put to use.  My dad instilled a love of craftsmanship in me and for that I will always be grateful.  I miss him, but hope that these little tokens will help keep his memory alive for me and my family.

Friday
Dec032010

Sweets for the tree

I had hoped to get this ornament made last year for the Christmas tree at my favorite local coffee shop and bakery but I ran out of time.  So this year it was given a higher priority on my to-do list to make sure I got it done.  The design came from Embroidery Library and was a delight to stitch out, as most of their designs are.  It is designed to be used as a towel topper but I think it makes a perfect tree ornament.  I also embroidered the shop name and date on the back.

I’ve been overly busy this week.  In addition to trying to keep up with my to-do list and blog posts,  I have also been getting ready for a craft show I am doing on Saturday.  I have spent the week cleaning, pressing and otherwise freshening up pieces, working on a few new ones, finishing up some UFOs, making new price tags, and gathering supplies and materials for my display.  This is the first year of a small show with about 20 vendors hosted by a local church.  Please stop by if you are in the area.

Holiday Market

Saturday, December 4th

9 a.m. to 3 p.m.

Calvary Presbyterian Church

6120 N. Kings Hwy, Alexandria, VA 22303

Watch for my next tutorial and giveaway coming on Sunday.  Hope everyone has a happy weekend.

Saturday
Nov132010

Bag of the Week 45

Asian Portfolio

I started this portfolio during a class at The Sewing Expo at the end of September.  All supplies and the instructions were provided, and I felt lucky that the fabrics selected were so lovely and to my liking.  The first step was to embroider a crane on dark brown velveteen; this piece became the back panel. 

Next, I strip pieced the various printed cottons to make the body of the bag.  The flap’s Courthouse Steps design was pieced from leftover strips and more of the velveteen.  The three elements were sewn together and the entire piece interfaced with iron on interfacing.  Next came a layer of canvas that was basted to the wrong side of the resulting panel.  The side seams were sewn and the bottom corners boxed.  A lining was added and the raw edges bound with a bias strip.  The scariest part was cutting the hole for the grommet; I proceeded with baby steps, gradually increasing the size of the cut hole until it was right.  I found it helpful to stitch around the opening before cutting to ensure the three layers could be cut as one unit.  The strap, which is edged with a serged wave stitch, was attached last.

I really love this bag and think it is very reflective of my style and taste.  I plan to use it to carry books and notepads to my various sewing events and meetings.  It can also hold a laptop.  I had enough scraps left over to create another little bag which I featured a few weeks ago.  All in all, a nice class with a beautiful finished product.

Thursday
Nov042010

Bag of the Week 44

Knitting Needle Case

I’m taking a little liberty this week with my definition of “bag”.  This is a knitting needle case that I made several years ago featuring the lovely embroidery of Evy Hawkins from A Bit of Stitch

I found directions on the internet and adapted them for my own use.  Here are two links that show you how to make a rolled up case that will hold knitting needles or paint brushes/tools.

Roll-up Knitting Needle Case

Paint Brush Holder