Julie Bowersett

juliebowersett{at}gmail{dot}com
Navigation
Search
Categories

Blog Writing Course Alumni

From Guide to Art Schools

CraftGossip

Entries in tutorial (14)

Sunday
Nov282010

Silver Spider Tutorial
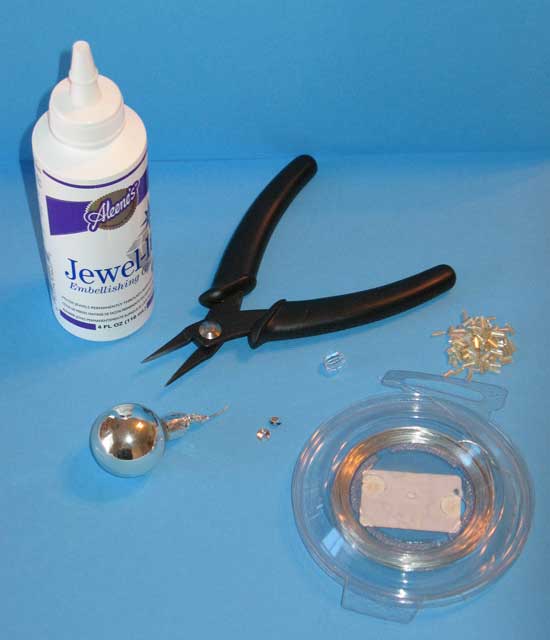
Materials

  • Small silver bulb ornament
  • 64 silver bugle beads
  • 1 clear, faceted plastic bead
  • 2 silver sequins (optional, see note)
  • 28 gauge silver beading wire
  • glue (I used Jewel-It but any glue appropriate for metal, glass, plastic will work; I don't recommend hot glue)
  • Wire cutters/pliers
  • Monofilament fishing line

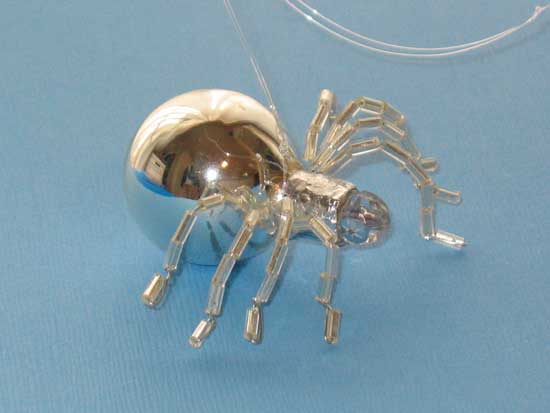
Begin by preparing the tree ornament.  Remove any hardware from the opening at the top of the bulb.  There are a number of types of bulbs with differing types of hardware.  Mine had a piece of wire glued into the top, covered with metallic paper.  I used the pliers to pull the wire out and trimmed the paper even with the opening at the top of the bulb.

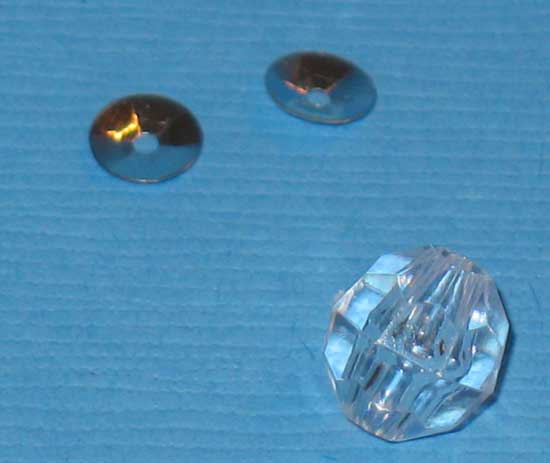
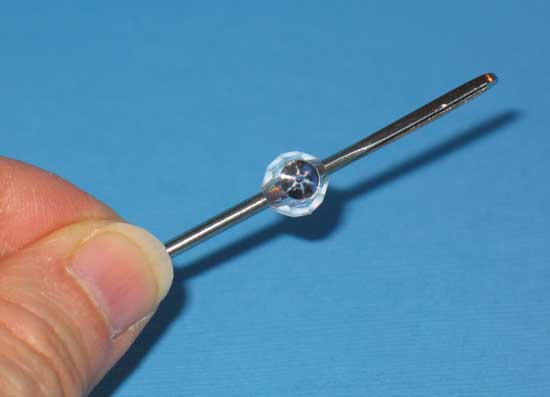
Next, glue the two silver sequins (eyes) to either side of the plastic faceted bead (head).  I found that placing the bead on a large tapestry needle made this task easier.  Set aside to dry.  NOTE:  I found that the sequins were almost invisible on the finished product and really feel this step is optional.

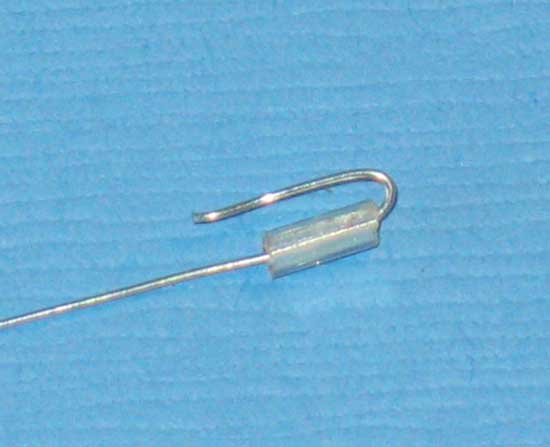
Cut four pieces of wire 5” long.  Working with one wire at a time, thread one bugle bead onto the wire, bend the wire over the bead and twist the end around the remaining wire to secure. 

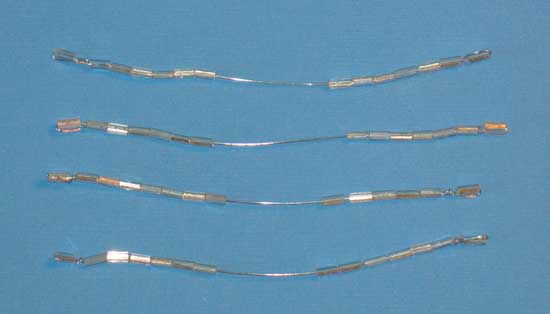
Thread an additional 13 beads onto the wire for a total of 14.  Secure the last bead in the same manner as the first.  Repeat for all four wires.  Note that the beads will not fill the wire completely.

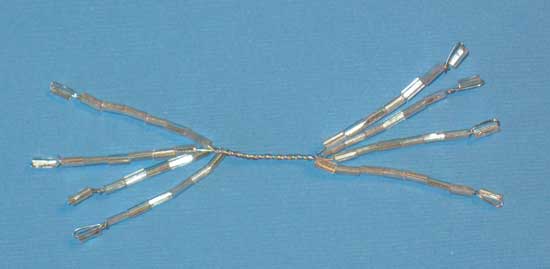
Lay the four wires parallel to each other.  Separate the beads in the center with 7 beads on each end of the wire.  Twist the wires together in the middle.  Continue twisting until the unit measures about 4” long.  This completes the legs.

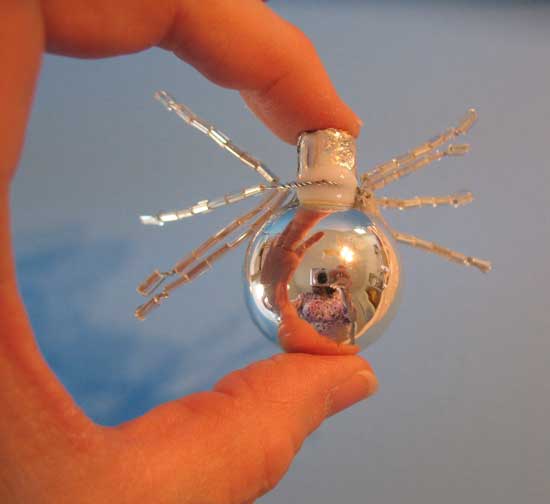
Bend the center of the leg unit into a slight curve and glue it to the underside of the bulb.  Use plenty of glue for this step.

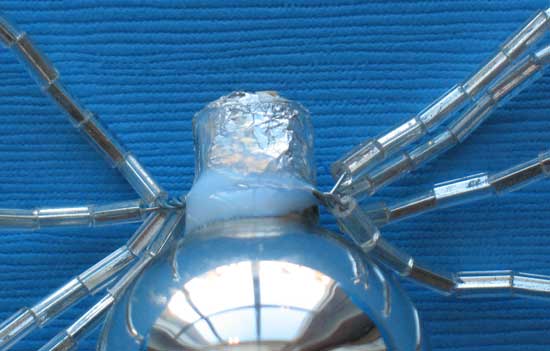
Glue the faceted head bead onto the end of the bulb and let dry.  Cut a piece of fishing line the desired length for a hanger.  Loop around the neck of the bulb, behind the legs, bring the ends to the top and tie an overhand knot to secure.  Trim to the desired length and tie another overhand knot at the end.

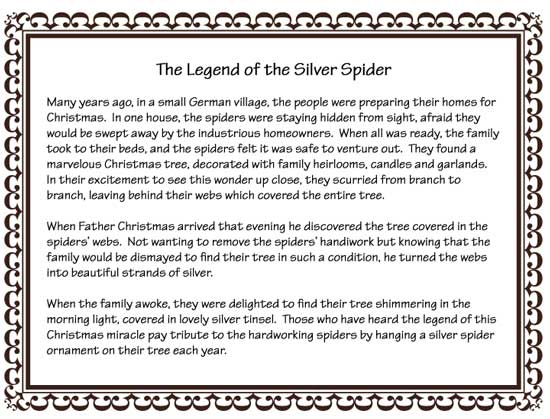
If you wish to give this as a gift, include a copy of the following story with the spider.  Right click on the image and “Save Image As” to a convenient place on your computer.  You can then insert the image into Word or other word processing file, resize it as desired, and print it out on cardstock.  Trim to size and punch a hole in the card.  Thread a thin piece of ribbon through the hole and tie through the spider’s hanger.

Tuesday
Jul272010

Cornice Board

I have used this sort of cornice board a number of times in my home.  I find it attractive and functional, providing a shallow shelf above the window on which to display objects.  This project is easy to put together with minimal tools and woodworking skills.  Here’s how:

Materials:

  • 1”x5” lumber (you can use wider lumber for a wider shelf, if desired)
  • L-shaped corner braces
  • Screws
  • Wall anchors
  • Closet pole bracket set (optional)
  • Dowel or curtain rod (optional)
  • Velcro (optional)
  • Screw Eyes (optional)

Tools:

  • Saw
  • Drill
  • Drill bit
  • Screwdriver
  • Tape measure
  • Pencil

Begin by measuring the width of your window, measuring to the outside of any trim.  Cut your board that width plus 3” Cut two smaller pieces 6” long.   These dimensions are not critical; you can adjust slightly larger or smaller to suit your needs. 

Using the corner braces as shown in the following picture, attach the two small boards to the ends of the larger board.  Pre-drill the holes for accuracy.

Attach two additional corner brackets to the back of the cornice.  These will be used to mount the cornice to the wall over the window using the wall anchors.

You can add additional hardware to your cornice to suit the various types of window treatments you plan to use.  In my example I have installed a closet pole bracket which will hold a dowel cut to length as a curtain rod.  My curtain will hang from this rod.

I have also stapled Velcro (the hook side) along the entire top front edge of the cornice, wrapping around the sides to the back.  My valance has the loop side of the Velcro sewn to the top edge, allowing me to easily install it on the cornice and remove it for cleaning.

Lastly, since the curtain I am using is a Roman shade, I have installed a row of screw eyes toward the back edge of the cornice.  This is the hardware needed for the cords of the Roman shade.  By using this cornice configuration I do not have to screw the eyes directly into the window sash.

Tuesday
Jul132010

Child's Apron Tutorial

I've made a handful of these aprons for my kids to wear.  They cover clothing, especially laps, better than bibs.  They are super simple to make and quick -- once your pattern is made you can whip one of these up in about 30 minutes.

First, create a paper pattern.  The apron I made is designed to fit small children, about ages 2 through 5.  Increase the dimensions as needed.  Begin with a rectangle 10” x 22” and orient it with the long edges running vertically.  From the lower left corner measure up the long edge 15” and make a dot.  From the top right corner measure across the short edge 4” and make a dot.  Connect these two dots with a pleasing curve (you can trace the edge of a curved object such as a plate).  Cut out the pattern along these lines and mark the longest edge with an arrow and notation to cut on the fold.

Using this pattern, cut one fabric piece on the fold.

Fold the bottom hem under ½” and press (I like to use a poster board template cut to ½” to help with this task.  Simply fold the fabric up to meet the edge of the template and press.) 

Open out the hem and fold the cut edge under to meet the fold, making a ¼” hem. 

Press and stitch in place.  Repeat this procedure for both side edges below the curve.

Apply the bias tape ties.  Begin with the two curved edges.  Measure 15” in from the end of the bias tape and place a pin.  Aligning the pin with the hemmed side edge, sandwich the fabric between the bias tape fold, make sure the narrower layer of the tape is on top.  The 15” will extend past the hemmed edge and serve as one of the ties.  Cut the bias tape even with the top edge of the apron.  Repeat for the other side.

Stitch close to the edge of the bias tape from the right side.  Continue stitching along the tie to the end of the tape.  Make an overhand knot in the ends of the ties.

Now apply the bias tape to the top edge of the apron.  Measure 12” and place a pin.  Match the pin to the outer edge and sandwich the fabric between the bias tape fold, again making sure the narrower layer of the tape is on top.  Before cutting the bias tape measure another 12” for the tie and cut at the end of this measurement. 

Beginning at the end of the tie, stitch close to the edge of the bias tape from the right side.  Continue stitching along the tie to the other end of the tape.  Make an overhand knot in the ends of the ties.

Tuesday
Jun292010

Ruffled Burp Cloth

I love making these as baby gifts.  A few weeks ago I knew TEN pregnant women (it’s now down to seven pregnant women and three new babies) so I spent some time perfecting my technique on these as they will be coming in handy in the future.  These are very simple to make, can be customized for the recipient and are usually very appreciated.

I have attached a gathered ruffle in this tutorial but you could easily make a pleated version which would be very appropriate for a little boy.

Begin with a purchased cloth diaper.  I usually do not prewash the diapers but I do press them with lots of steam to remove any shrinkage. 

Square the ends of the diaper and serge or zigzag the cut edges (which will fray remarkably if you don’t).

Measure the width of the diaper.  My instructions are based on a diaper that measures 15” so adjust cut fabric lengths accordingly if necessary.

Begin by embroidering the baby’s name or another appropriate design on the lower edge of the diaper.  I like to center the design horizontally about 1.75” up from the bottom edge of the diaper.   (Not shown on the tutorial example.)

Next, cut the fabric strips for the ruffle, edge binding and trim strip.  In my example I used the same fabric for the ruffle and to bind the opposite end and a contrast fabric for the trim strip.  Cut as follows:

Ruffle:  3” x 32” (about 2 to 2.5 times the width of the diaper)

Edge binding:  2” x 16”

Trim strip:  1 ¼” x 16”

Fold the ruffle fabric in half lengthwise, wrong sides together (WST) and press.  Refold short ends right sides together (RST) and stitch in ½” seam.  Press seam open, turn and press flat.

Mark the ruffle and the lower diaper edge (on wrong side) in quarters.  Run two rows of gathering stitches approximately 3/8” and ½” in from the long raw edges of the ruffle leaving long thread tails. 

Matching the quarter marks on the ruffle to the marks on the diaper pin the ruffle to the WRONG side of the diaper.  Draw up gathering threads to fit and baste at 3/8”. 

Press one long edge of the trim strip under ¼”. 

Fold in one short edge ½” and pin on top of ruffle, RST, matching raw edges.  Folded edge of trim strip should be flush with the edge of the diaper.  Fold under remaining short edge so fold is flush with opposite edge of diaper (trim off excess if necessary) and pin in place.

Stitch slightly beyond the 3/8” basting stitches through all layers.

Flip ruffle and trim strip to the diaper’s right side and press.  Stitch close to the edge of the trim strip.  Match the color of the top thread to the trim strip and the bobbin thread to the diaper.

Press one long edge of the binding strip under ½”. 

Fold in one short edge ½” and pin to remaining short edge of diaper, RST.  Fold under remaining short edge of binding so fold is flush with opposite edge of diaper (trim off excess if necessary) and pin in place.

Stitch at 3/8” through all layers.

Fold binding to wrong side of diaper and pin in place.  Stitch in the ditch from the right side to secure (I like to use an edge joining foot for this, as pictured).

These are quick and easy to make.  You could make some up to keep on hand and add the embroidered name at the end.  Enjoy.

Monday
Jun142010

Baby Crib Sheets

Crib sheets are very easy to make and make great baby gifts.  You will end up with a sheet of much higher quality than the ones you buy in the stores for two reasons:  you can use a high quality 100% cotton sheet as your fabric (most store bought crib sheets will not be made from this quality of fabric) and you can apply elastic around the entire sheet (not just at the corners like most purchased sheets) which allows for a better (and safer) fit.  These sheets also fit toddler beds.

Here are some easy to follow instructions for creating your own crib sheets.  You can start with any fabric that is at least 45 inches wide but it must measure an actual 45 inches.  I recommend that you prewash any fabric first since these are designed to be tight fitting and any shrinkage after they are made will make it very difficult to place on the mattress.  I also recommend 100% cotton fabric for the baby’s comfort.  My favorite source for fabric is other sheets.  You can often find very good quality sheets on clearance at stores and online.  My favorite shopping spot is The Company Store (and Company Kids).  Their sheets are very high quality and you can often find something useful in their clearance section.   You can get two crib sheets from each double or queen sized flat sheet.  If you are willing to unstitch the hems on a twin sized sheet you can sometimes get two crib sheets from that size, too.

Standard crib mattresses are 27” x 52”.  (Here is a handy website to bookmark that has standard bedding and mattress sizes.

  • Begin by cutting your fabric 70 inches by 45 inches. 
  • Cut an 8.5” square from each corner of this rectangle.
  • With right sides together, match the two cut edges of each square opening and stitch, forming a boxed corner.  I use my serger and a three-thread stitch for this step which roughly makes a 3/8” seam.  Repeat for all four corners.
  • You will need 2.5 yards of 3/8” elastic.  Make sure it is the sew-through variety.  Butt the cut ends together and zigzag over the join, forming a continuous circle of elastic.  Mark the elastic into quarters (fold in half on the seam and mark the other fold, refold so seam and mark match and mark the new folds).
  • Mark the sheet into quarters.  You will want to mark the center of each raw edge between the corners.
  • Pin the elastic to the wrong side of the sheet, matching the quarter marks on the elastic to the quarter marks on the sheet.  Stretch the elastic between two of the marks and serge the elastic to the edge of the sheet.  Repeat for all four quarters of the sheet.
  • Turn the edge under encasing the elastic.  Stretch flat and zigzag through the sheet and elastic around the entire edge of the sheet.