Julie Bowersett

juliebowersett{at}gmail{dot}com
Navigation
Search
Categories

Blog Writing Course Alumni

From Guide to Art Schools

CraftGossip

Entries in ribbon embroidery (3)

Friday
May282010

Bag of the Week 20

Seascape Bag

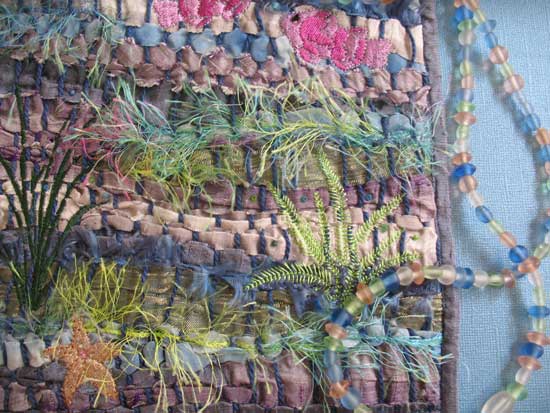
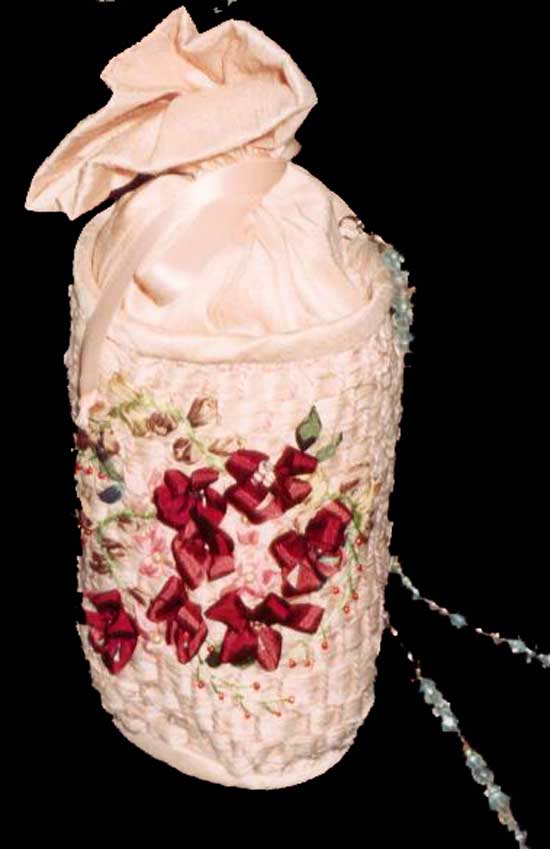
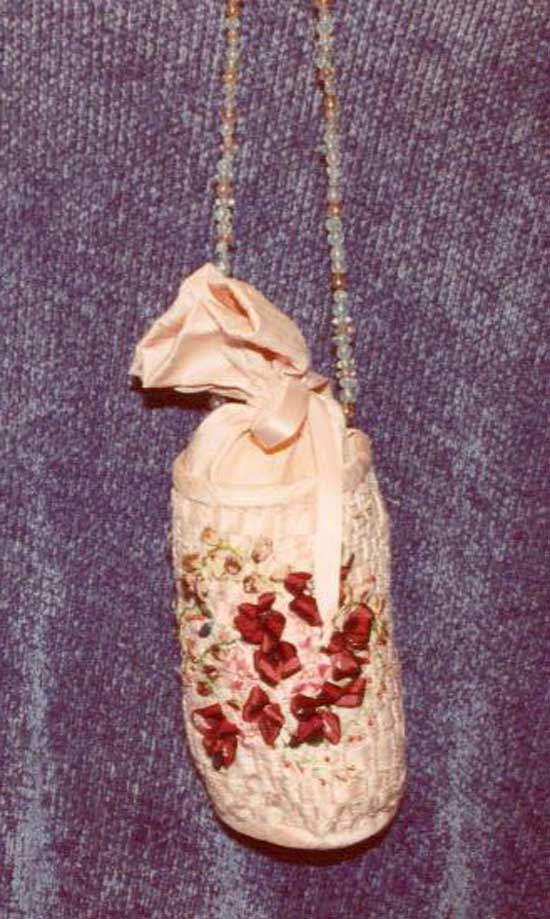
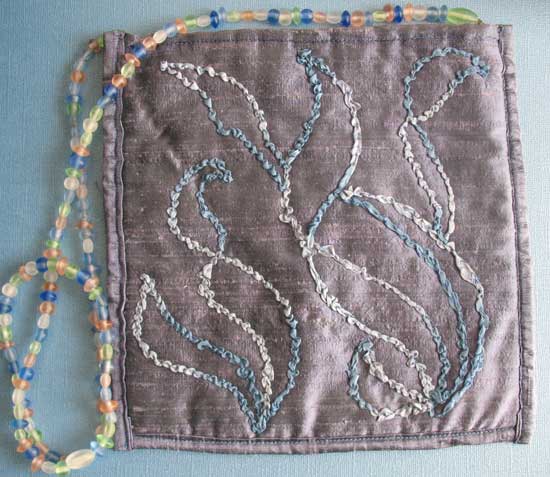
Last week I posted about a handwoven bag I made using one of Deborah Brunner’s patterns.  This week I am highlighting another of Deborah’s patterns, Handwoven Seascape Bags.  Like the previous bag, this one was created by weaving torn strips of fabric through a base made of Pearle cotton thread.  Several colors of silk dupioni were used as well as some hand painted China silk and even a piece of metallic ribbon.  To create the feel of underwater grass I added several different eyelash yarns.  Instead of weaving the rows horizontally across I created wavy lines to simulate the underwater environment.  Deborah’s patterns include instructions for embellishing the bag with silk ribbon embroidery which I did on the first bag I made (not shown).  I created a second bag as a sample for a class I was teaching and on this one I used machine instead of hand embroidery.  The plants were stitched from Cactus Punch’s Scenery Ingredients CD and the fish and starfish were freebies I downloaded from the internet.  I also added glass beads to simulate bubbles, and the strap was made from more strung glass beads.

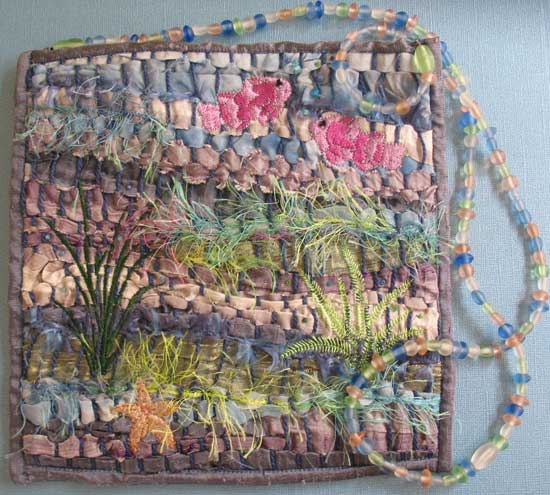
The back of the bag was adorned as well.  The pattern includes a seaweed quilting pattern which can be stitched on the back panel of the bag.  I took a different approach and stitched the design with bobbin work using variegated silk ribbon in my bobbin. 

The edges of the purse are bound with fabric strips during the construction and the bag is lined, as well.

This is a very cute pouch-style purse (the pattern includes two views, the simple pouch style and a one with an ultrasuede flap) and the embellishment opportunity is vast.  I think this would be great done in a desert design with warm colors and embroidered with desert plant life.  Or maybe a hills and valley scene with wild flowers.  Use your imagination and create a one-of-a-kind work of art.

Thursday
May202010

Bag of the Week 19

Handwoven Mini Drawstring Bag

A number of years ago someone brought a Deborah Brunner bag to a gift exchange and everyone fought over it.  Deborah has created several fabulous patterns for bags made from handwoven (or pinwoven) pieces of fabric.  Their diminutive size makes these projects simple to complete without a huge investment of time (which handweaving can demand).  I have made several of these bags and will showcase them today and next week. 

This little pastel pink drawstring bag was created by weaving a panel of torn fabric strips (I used silk dupioni).  First, a foundation is created using Pearle cotton thread pinned to a foam core base.  The fabric strips are woven through these threads and the panel sewn to additional silk to create this 9” purse.  The woven panel was adorned with silk ribbon embroidery and beading.  The strap was created from strung glass beads.

These pictures were taken in the olden days of film so I apologize for their poor quality.  Next week I will feature an underwater seascape created with the same weaving technique.

Tuesday
May112010

An Iris Sachet

Each week during the school year I attend a Community Bible Study class.  My youngest son goes with me and stays in the nursery while I go to my small group.  This week will be the last time we meet this year and I wanted to make something to take to the nursery attendant that watches him each week.  Her name is Iris so I first looked for machine embroidery designs featuring that flower.  I finally settled on doing a bit of silk ribbon embroidery and making a little sachet.

The iris is an easy flower to create with ribbon embroidery as it is created with a lazy daisy (or chain) stitch and some straight stitches.  I found a lovely video on YouTube that showed numerous ways of creating this bloom but I went with the simplest form.   The hand-dyed silk ribbon I used came from RibbonSmyth and was lovely but the too-long delivery time on my order makes me hesitant to order from them again.

I began with a six-inch square of white dupioni silk and marked a four-inch square in the center.  Turning the square on-point, I marked three straight lines representing the stems and machine stitched those using a triple stitch and rayon thread.  Next, I embroidered the flowers and the leaves (which are simple straight stitches with a twist).  I trimmed the finished square to four inches and basted a length of ribbon to the top corner for hanging.  Next I cut another four-inch square of fabric and sewed the two right sides together, leaving a space for turning.  I made a small muslin “pillow” and stuffed it with potpourri.  I used batting and fiberfill to stuff the sachet and hand stitched the opening closed.  I used more of the silk ribbon to tie a bow at the top.  I hope Iris will enjoy her new sachet.