Julie Bowersett

juliebowersett{at}gmail{dot}com
Navigation
Search
Categories

Blog Writing Course Alumni

From Guide to Art Schools

CraftGossip

Entries in skirt (9)

Thursday
Jul252013

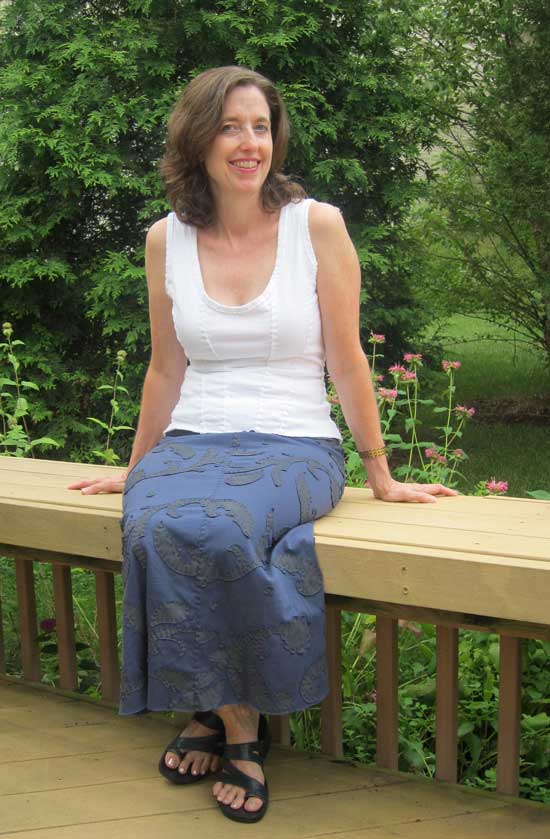
Storm Blue Alabama Chanin Paisley Skirt

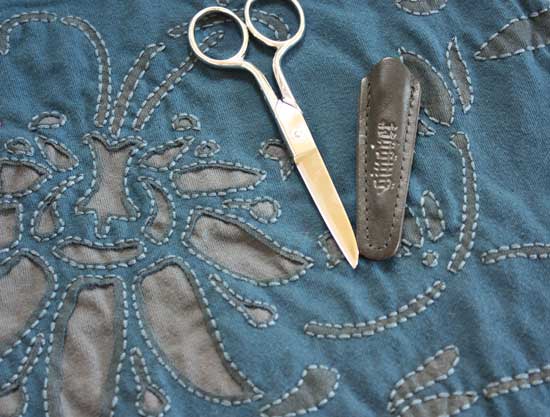
When I attended the workshop at Alabama Chanin's Factory in November 2011, I chose for my project a blue dress (which I have yet to post pictures of the completed garment) with a backstitched reverse applique design.  Here's what that technique looks like:

At the workshop Natalie Chanin told me that the backstitch would take three times as much thread and three times as long as the running stitch reverse applique technique (both techniques are covered in their three books).  She was probably right about the thread, but I believe she underestimated the time commitment.  At least for me it seemed like this project took a very, very long time (over one year, as a matter of fact). 

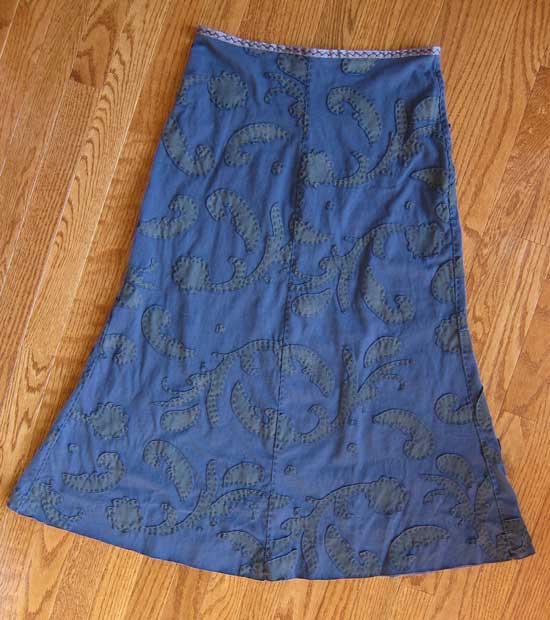
During one of their terrific sales around the 2012 holidays, I ordered a kit for a skirt stenciled with the Paisley design and using the negative reverse applique technique.  I was really amazed at how fast this stitched up, especially compared to the previous garment that I worked on.  I started this skirt in the airport on a trip I took (alone, without my kids) and by the time I returned home two days later I had finished the stitching on one panel.

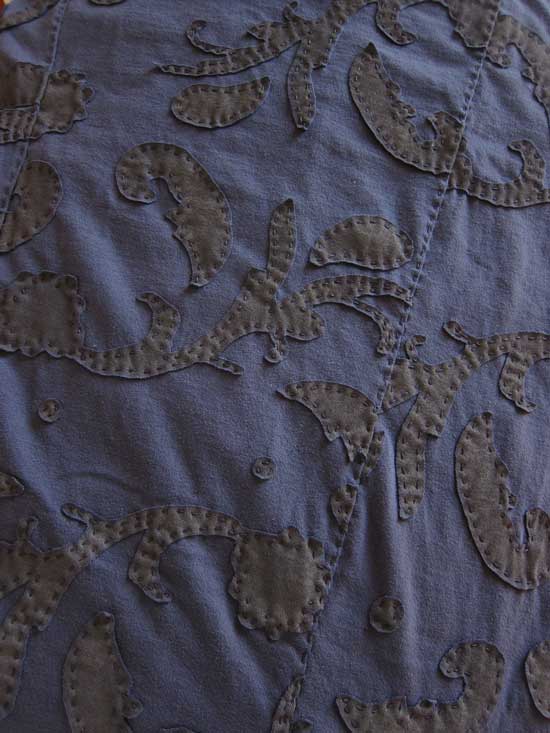
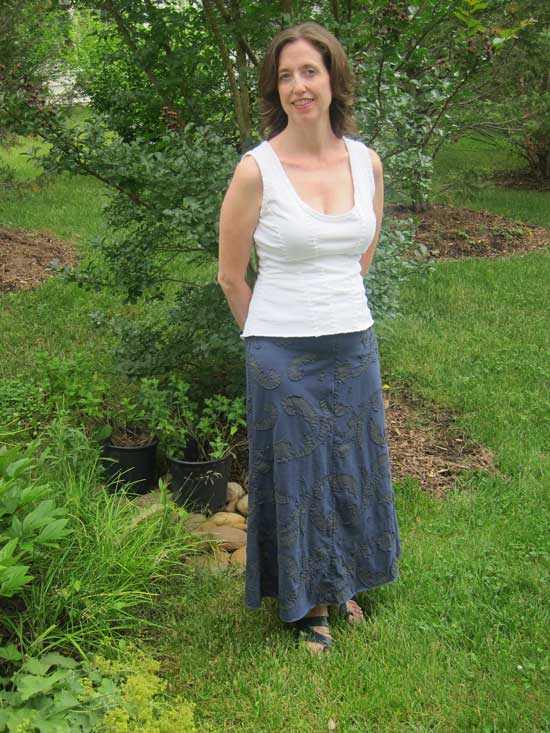
This skirt was created from the lightweight cotton jersey and was the first time I had used that fabric.  It makes a really nice light weight summer skirt, especially when you remove most of the top layer by cutting away the background from the design.  The resulting pattern develops a lot of textural interest as the tips and edges of the paisley design curl.

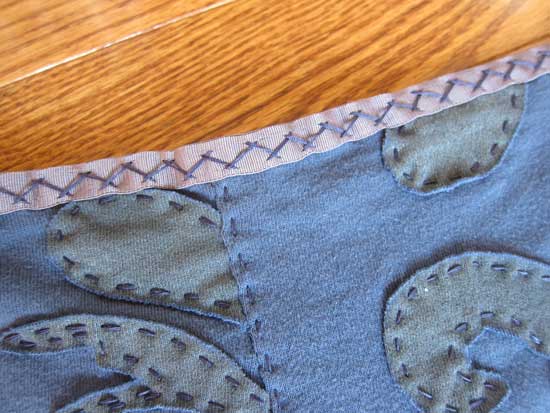
It was on this waistband that I first tried my homemade tiger tape to aid in keeping the stitches even.

I have really enjoyed wearing this skirt and can recommend this particular technique (or the standard reverse applique with a running stitch) if you are looking for a project that works up fast.

Wednesday
May092012

Paisley and Houndstooth 

Who knew that paisley + houndstooth is a match made in heaven?  Here’s the story of my discovery.

Photo from Alabama Studio Sewing + Design

I waited (notice that I did not say patiently) for many months for the release of Alabama Chanin’s latest studio book, Alabama Studio Sewing + Design.    When it arrived it was even more beautiful than I thought possible.  In this third book, Natalie Chanin and her staff have truly given away all of their secrets.  The book is a compendium of all of the various techniques used to create the lovely line of clothing they produce from their workshop in Florence, Alabama.  This latest in the series is meant to complement the other two books though it can easily stand on its own as the only resource you need.  Inside the cover you will find details on the materials and tools needed, eleven stencil designs, a myriad of stitches with illustrations, full-sized patterns for 4 garment pieces that can be constructed in a number of ways plus several accessory pieces, and enough embellishment ideas to keep you busy for the rest of your life.  Even if you have no intention of using the book to make garments or accessories, the photographs alone make this book worthy of the coffee table.  It is, in short, 175 pages of pure inspiration.

Photo from Alabama Studio Sewing + Design

Photo from Alabama Studio Sewing + Design

This book arrived while I was working on my blue wool crepe dress.  As sometimes happens, I start thinking about my next project while I’m still working on an unfinished one.  This time I dreamed of using more wool crepe from my stash since the current piece I was working on was such a dream to sew.  My mind was also busy mulling over all of the possibilities opened up for me from reading Sewing + Design.  What came out of that brainstorming is this skirt.

My fingers were busy with wool while I was thinking about organic cotton appliqué.  Why couldn’t I substitute wool felt for some of the appliqué designs from the book?  Wool felt has a lovely weight and doesn’t fray; it would make the perfect embellishment for my wool skirt.  I found some loosely woven black wool crepe in my stash and threw it in the washer and dryer a couple of times.  It felted up very nicely.  I also decided on the Paisley design that is include as one of the stencil patterns in the book.

Photo from Alabama Studio Sewing + Design

First I started with the skirt.  The pattern is Simplicity 2058 from the Amazing Fit series.  After fitting my muslin I cut the skirt from a loosely woven wool houndstooth check in classic black and white. 

I knew the fabric would need to be underlined if I was going to apply appliqué so I cut the underlining from charcoal gray silk organza.  I used the technique of underlining and seam finishing all in one that I’m fond of.  It makes for a beautifully finished garment interior.

Once the skirt was constructed (I left one seam unsewn, allowing for a flat panel to work on) I started the hand appliqué.  Alabama Chanin’s techniques include using stencils as the means of transferring designs to cloth.  Several ways to accomplish this are included in the book but I tried something different for this project.  First, I printed out the paisley design from the full-sized download available on the Alabama Chanin website.  I then copied it onto freezer paper and cut out the stencil with an Exacto knife.  This left me with both a positive and negative stencil. 

I used the positive stencils, shown above, to cut out the black wool felt.

Next, I took the negative stencil, centered it on one skirt panel and ironed it into place.  I removed the paper backing from the black felt appliqué pieces and positioned them in the openings of the negative stencil.  The photo below shows one of the appliqué pieces pinned in place.

After all of the pieces were placed I carefully removed the negative stencil paper and hand stitched each appliqué in place with a parallel whipstitch and black buttonhole craft thread. (I quickly discovered it was easier to work with small safety pins rather than straight pins to keep the appliqués  in place; this also led to less bloodshed while stitching).

Taking a tip I learned from Sarah Veblen, I constructed the waist facing from interfaced silk dupioni which I bound with a strip of white china silk.  This makes a really nice facing:  the silk feels more comfortable than wool and there is no bulk.

I finished the hem with some cotton lace from my stash (you can read more about the hem here).

I’m really pleased with this skirt and am sorry I finished it so late in the season that I will have to wait until next fall to wear it.  I think it will look great with black boots.  I particularly love the juxtaposition of contemporary vs. traditional in this garment.  The modern version of the paisley is a nice contrast to the more classic look of the houndstooth.  I also love that I can take an idea and tweak it to make it my own.  I think this new book in my library will offer lots of opportunity for that sort of thing in the future.

Monday
Jan092012

A Knit Skirt Knock-off

I've been working on this skirt for several months.  It has been an off-and-on project, one where the design/drafting stage took ten times longer than the construction.  My inspiration came from Garnet Hill, a catalog which provides beautiful pictures of stylish clothes.  I liked this skirt so much I debated ordering it but decided I could probably recreate it with a little work.

It took three tries to get the proportions/angles right on this skirt, with as many muslins.  I began with Pamela's Patterns' Magic Pencil Skirt.  I made a muslin and fitted this skirt (I had to adjust the width/length of some of the darts) and then made a full sized pattern (as opposed to one cut on the fold) and drew in an angled hemline. 

The lower flounce portion was trickier.  I turned to my Pattern Master Boutique program and used the Pattern Editor feature which allows for computer aided drafting of pattern pieces.  For my first attempt I drafted a full circle flounce with a graduated depth.  This didn't give me the look I was after -- I wanted more of a trumpet shape.  I remembered a Neue Mode pattern with a similar look and found I had saved an online copy of the pattern piece shapes.

Using that as a guide I drafted a partial-circle flounce and made another muslin.  This time the flounce was not full enough.  I re-drafted the flounce again, and this time I got it right.  Along the way I also changed the angle of the hem of the upper portion and the depth of the lower flounce accordingly.  It also took two tries to get the narrow inset flounce the right width and fullness.

Once all of the design issues had been worked out, sewing the skirt together took very little time.  I used a piece of cotton knit fabric from my stash in one of my favorite colors, a blue I would call light/bright navy.  This fabric (which I bought from G Street Fabrics) has a lovely, heavy hand and drape.  When I found it in my stash I knew it would be perfect for this skirt.

These pictures show the skirt with a ready-to-wear top I already owned.  I'm working on another top to wear with it, too.  After having this skirt on my to-do list since November, I'm happy to finally be wearing it.

Wednesday
Jan042012

Another Cynthia Guffey Skirt

I hope everyone is settling into the new year and sticking to those resolutions.  I have only two this year:  sew more garments and try to spend 30 minutes each day doing some handwork (Lord knows I spend twice that wasting time on the internet).  Today marks the second anniversary of my blog.  I'm grateful to all of you who check in and read what I have to say.  I'd like to post more frequently than I do, but the reality is that it takes time, something that is in short supply these days.  This year I hope to further improve my photography and post in a timely manner.  I should have written today's post back in November when I completed this skirt.  My memory of the details is a little fuzzy but here's what I've got.

This is one of the more complicated patterns I have attempted in a long time.  Cynthia Guffey has drafted a 12-gore skirt with yoke whose detail is really pretty spectacular.  I first saw this skirt in person at the Sewing Expo a couple of years ago; it is an architectural marvel.  Each gore is cut on the bias twice the finished length and seamed together with a French seam down the center of the gore.  This leaves a little scallop along the hem.  The gores are then sewn together.  All of the seams are finished to the outside, adding even more interest.

I chose to make the skirt from a knit instead of a woven fabric.  I decreased the seam allowance on the joining seams and left the edges raw.  I constructed the seams by machine but stitched all of the visible exterior stitching by hand.

I finished the waist with foldover elastic, zigzaging along the edge through both layers.  This makes a wonderfully smooth and comfortable waist finished.

I like this skirt A LOT and might even consider making another if I can think of a variation that wouldn't look like the same skirt.

I find myself in an unusal place tonight.  I'm finishing up another skirt that I have been working on for a long time and I don't really have another project waiting to go when it's complete.  I usually have a long list of items to be completed, but with no pressing deadlines I want to take some time to think about what's next and come up with a project that will take some planning and thought.  Maybe I'll make use of something I've learned in the past year.  I don't know, but when I do, you'll be the first to hear about it.

Tuesday
Nov012011

Corduroy Skirt, Cynthia Guffey style

I'm finally back to sewing some clothes for myself.  The first outfit I completed is this corduroy skirt and coordinating tee.  The skirt pattern is Cynthia Guffey's princess seamline skirt with graduated pleats circling the hem of the skirt.  This is the second time I have made this skirt; the first version was done in denim.  I decided I wanted a deeper pleat for the second try so I altered the pattern to achieve this effect.  There are a total of eight pleats.

The fabric I used is a very soft and drapey baby-wale corduroy.  I thought the fabric could use a little extra body, so I underlined it with a charcoal gray silk organza I had on hand.  This organza has a soft hand, more like lawn than the typically crisp organza you normally find.  It had just the right body for this project.  I machine washed both before starting and cut both layers at once, layering the corduroy over the silk.

Here are the two layers pinned together as one.

On the denim skirt I made previously, I serged the cut edges before starting.  This was a little tricky down in the hollows of the pleats.  For this skirt I decided I wanted to apply a Hong Kong finish to the edges, which I did before I started the construction phase.  To accomplish this I did two things:

I rounded off the inside corners to make applying the bias strip easier (the pattern is still in place in this picture with its squared off corners); and

I cut about a mile of 1" bias strips from some lightweight silk crepe I had in my stash.  (An aside:  I try hard to keep my stash full of only colors I will wear but occasionally I bend that rule and keep something that I think might come in handy for a lining or bias strips.  Such is the case with this dusty purple silk, a color I could never wear.   I never feel very reluctant to cut into fabrics like this for some reason.)

I bound each edge with the bias strips, a task that took quite a while but was ultimately worth it.

With the exception of finishing these edges, this skirt is actually pretty easy to construct and doesn't require as much fabric as you might think.  The pattern piece fits on the width of a 45" piece of fabric which means you need two skirt lengths (plus some extra for a waistband if you wish), about the amount required for most skirts.  I decided to finish the waist with a bias strip of the corduroy fabric (remember to remove the upper seam allowance if you choose this method).  I hand picked my lapped zipper and used a hook and eye to close the top of the waist.  I'm very pleased with the results.  I'm hoping the underlining will keep the wrinkles to a minimum.

The top I'm wearing deserves its own separate post since it was a great learning experience, so I'll write about that in a day or two.  I'm already underway on my next project and will have pictures of that soon, too.  Thanks for visiting.