Our family is sliding into summer. My youngest's last day of preschool was last week, and in two weeks' time I will have both boys at home with me for several months. I am hoping to build some structure into our days to prevent the grumpies (for both mom and kids) that come with too much boredom. You can bet that I'm going to build in some creative time each day, especially for me.
The end of the year also brings about the time for little farewell gifts for teachers and friends. This year I celebrated the end of the preschool year with a number of friends who I have been spending afternoons with on the playground, a group we have christened "The Village" (in the spirit of "it takes a village to raise a child"). Most of us will be moving on to new schools or states next fall, so this celebration had a bittersweet quality to it. I wanted to make a little memento for these friends, something that would remind them of our time together every time they used it.
I had long ago bookmarked (in the old fashioned way) some pages in a Quilting Arts Gifts magazine (Holiday 2011-2012) for later reference. The article, Emery Board Holders, by Deb O'Keefe Hysack, outlined the steps for making three different types of nail file holders. I love what Deb has to say about these little creations: "I like the idea of reaching into my purse and taking out a small piece of art for an everyday purpose". As I have written before, I am always on the lookout for little tiny gifts for giving that do not come with a big obligatory price to the recipient, something that says "I am thinking about you" or "please remember me". These fit the bill wonderfully: they can be made in very short order with scraps of fabric, are lovely to look at and are practical (one friend commented it would allow her to carry an emery board in her purse without scratching her phone screen).

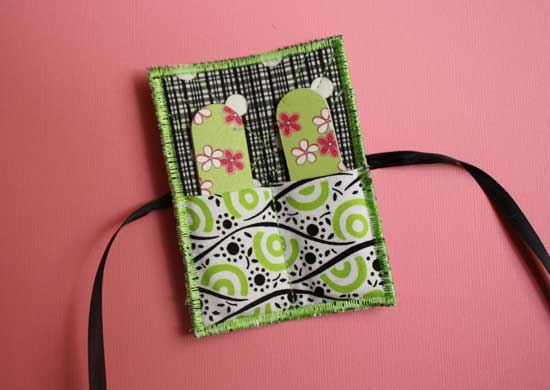
The holders I made are even tinier than those in the article with a finished size of 4" x 1.5". Here is how I created my version.
Cut three rectangles of fabric, 3" x 4". This can be three different fabrics or, as I did, two rectangles of one fabric and one of another. Fold one piece in half to form a 2" x 3" rectangle to use as the pocket. Also cut one 3" x 4" piece of heavy interfacing (I used Timtex). Sandwich the interfacing between the two larger rectangles of fabric and quilt them together in whatever manner you wish. I used decorative stitches built into my machine or channel stitching but you could also free-motion the stitching.
Next, place the folded piece of fabric on top of the quilted piece, at the bottom, matching the raw edges with the bottom and sides and with the fold at the top of the pocket. Baste the raw edges together through all layers and stitch securely through the center of the pocket, forming two openings. Be sure to backstitch at the top of the pocket to reinforce that edge. Check the placement of your nail files to make sure they fit the pockets.
Set your machine for a dense zigzag (W 6, L 0.4). Stitch around the perimeter of the piece to finish all of the raw edges, allowing the needle to just swing off the edge of the fabric on one side.
Cut a piece of narrow ribbon 15" long and hand tack it to the outside of the case just at the point where you backstitched the pocket.
Insert the emery boards (I used mini emery boards that are 3" long) and tie the ribbon to close the case.
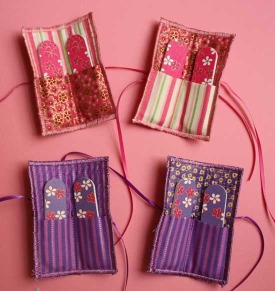

I made a couple of extras to include in a card to my older son's teachers at the end of the year. These would make great teacher gifts.
I hope you enjoyed this little project and that you will find time to make a few. I would love for you to share other DIY Teacher Gift ideas here.